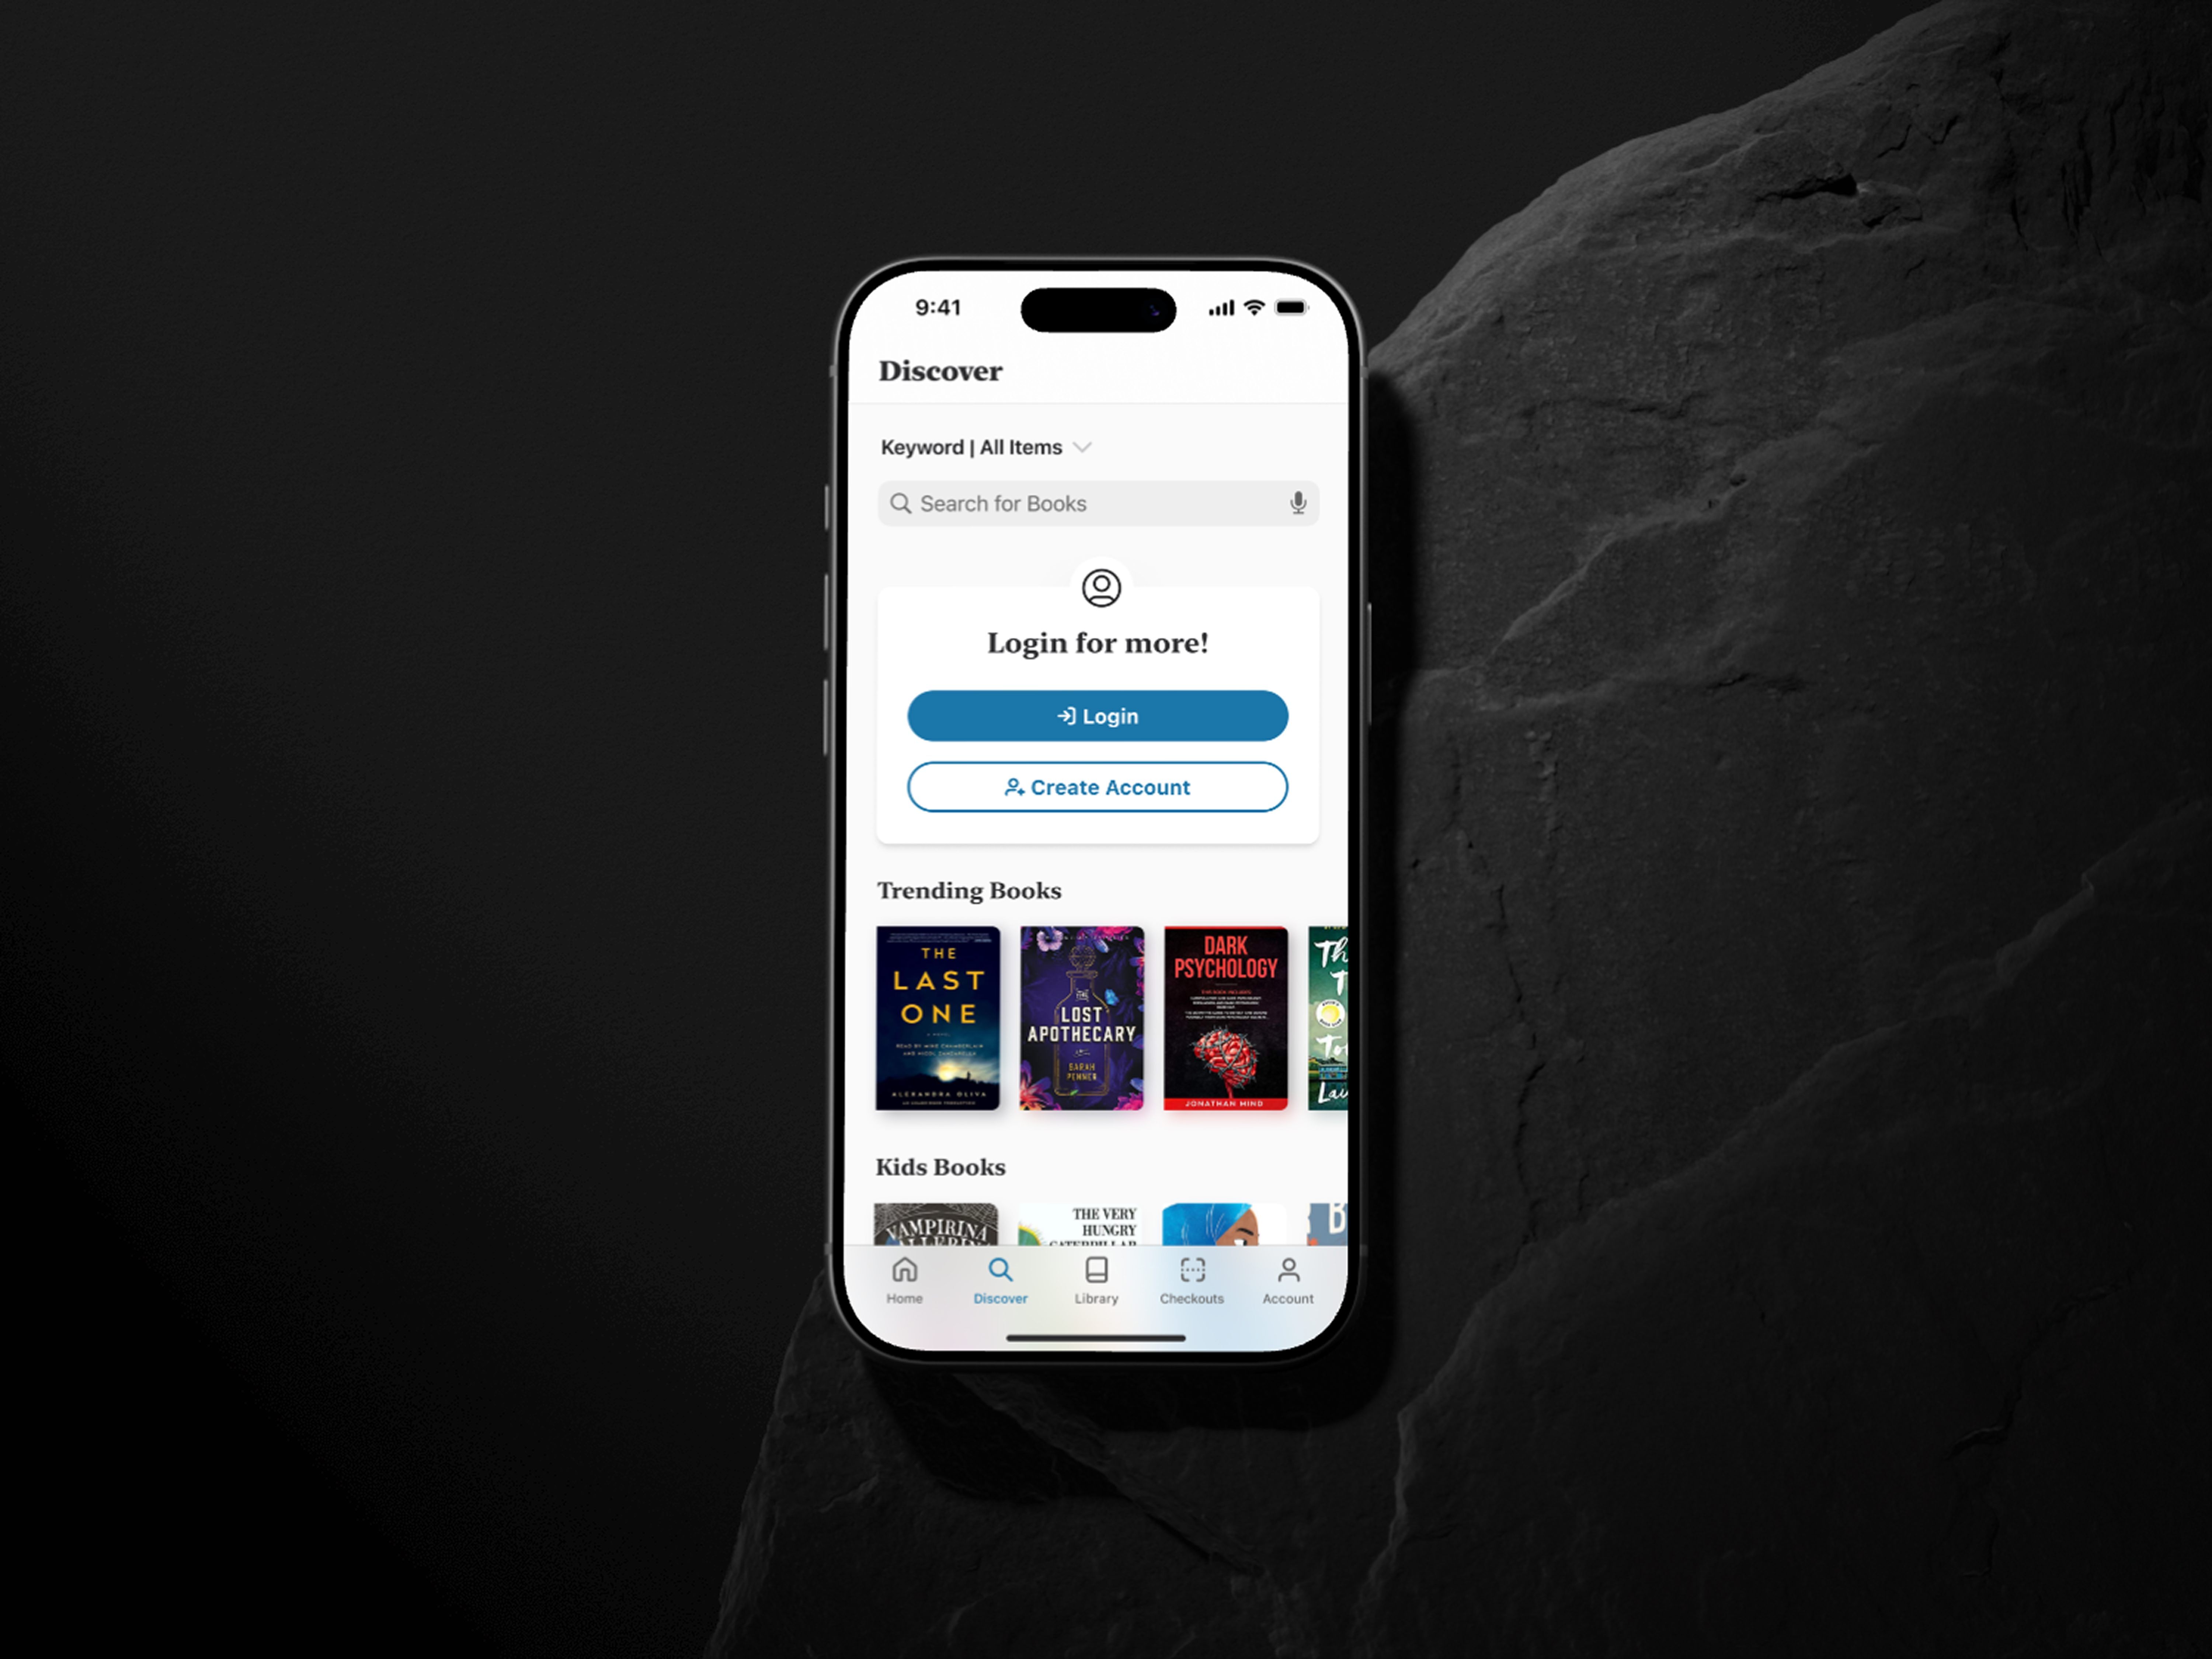
Executive Overview: Understanding LangGraph for LLM-Powered Workflows
LangGraph is a framework designed for building and managing complex AI workflows using a graph-based approach. This article provides a comprehensive guide to its core components, implementation patterns, and best practices.
Key Highlights:
- LangGraph Studio: A powerful IDE for real-time visualization, debugging, and monitoring of graph executions. Features include graph visualization, hot reloading, and interactive debugging.
- Graph Components: LangGraph workflows consist of nodes (processing units), edges (connections defining flow), and state (persistent context).
- Types of Nodes: Includes LLM nodes (leveraging AI models), agent nodes (with tool integration), human-in-the-loop (HIL) nodes (requiring user input), and tool nodes (grouping functions for agent nodes).
- Control Flow & Edges: Supports required edges for fixed workflows and conditional edges for dynamic decision-making.
By leveraging LangGraph, developers can create flexible, scalable, and AI-driven applications with enhanced debugging and execution flow management. Dive Deeper into LangGraph with our full article.
Understanding LangGraph: A comprehensive guide to graph-based workflows
LangGraph is a powerful framework for building deterministic and non-deterministic AI workflows using a graph-based architecture. This guide explores its core components, implementation patterns, and best practices for creating sophisticated AI applications.
Before we begin, it’s worth mentioning that LangChain has built a convenient chat agent that can answer questions based on the LangGraph documentation. Consider using it as a supplement to this guide.
To get started you will need to install the following dependencies and expose the necessary API keys for the LLM models you will use. In this article we will be using an Anthropic model.
langgraph
langchain
langchain-anthropic
python-dotendev
langchain-community
Visual Debugging With LangGraph Studio
LangGraph Studio is a powerful IDE designed specifically for real-time visualization and debugging of CompiledStateGraph applications. Available in both desktop and web versions, it provides developers with essential tools for monitoring and manipulating graph executions in real-time.
Installation
To begin using LangGraph Studio, install the required packages:
pip install -U "langgraph-cli[inmem]"
pip install -e .
Configuration
Create a langgraph.json file in your project root. YourGraphName will be the name the IDE uses to identify your graph.
{
"dependencies": ["."],
"graphs": {
"YourGraphName": "./path/to/graph.py:graph"
},
"env": ".env"
}
The graph’s dictionary maps graph names to their respective paths, pointing to CompiledStateGraph objects.
Launch the Studio
Start the web interface with:
langgraph dev

Core Features
Graph Visualization
LangGraph Studio provides an intuitive web interface for visualizing your graph’s execution flow. The interface includes:
- Real-time node execution tracking
- Visual representation of graph structure
- Execution path highlighting
Interactive debugging: Manual interrupts
One of the most powerful features is the ability to set manual interrupts
- Place interrupts at any point before and/or after a node’s execution
- Pause execution to examine node states
- Monitor execution flow step-by-step
- Review previous node executions in the thread
Visualization Options
Toggle between two view modes
- Pretty View: Simplified, clean representation
- JSON View: Detailed information for deep debugging
Hot Reloading
LangGraph Studio supports hot reloading, allowing you to:
- Modify code while debugging
- Apply changes without restarting
- Test modifications immediately
Node Re-execution
Debug and test node reliability by:
- Re-running specific nodes
- Testing LLM response consistency
- Validating node behavior after code changes
Output Manipulation
Fine-tune your graph’s behavior through:
- In-line output editing
- Execution path forking
- “What-if” scenario testing
Graph Management
Efficiently manage multiple graphs:
- Rename graphs through langgraph.json
- Switch between different graph versions
- Select graphs from the dropdown menu
Best Practices
- Version Control: Use meaningful graph names for different versions
- Interrupt Strategy: Place interrupts strategically to monitor critical decision points
- Output Testing: Utilize the output editing feature to test edge cases
- View Selection: Use Pretty View for quick checks and JSON View for detailed debugging
Graph Components
A LangGraph workflow consists of three essential components
- Nodes: Processing units that perform specific tasks
- Edges: Connections that define flow between nodes
- State: Shared context that persists throughout execution
Implementation of these components will vary depending on the graph’s purpose and in some cases we can leverage pre-built LangGraph convenience functions to streamline the development experience.
Nodes
As vital elements in graph state management, they are responsible for managing state mutations within a system. Each node functions as a processing unit, receiving state data, executing specific operations, and producing modified state information. This process forms the foundation of the graph’s data flow.
Core Node Functionality
Every node operates through a consistent three-step process:
- Receiving the graph’s state or a portion of it as input
- Performing state mutation operations
- Returning the modified state

This standardized approach ensures consistent state management across the entire graph structure, regardless of the specific implementation details.
Node Implementations
A node’s implementation will depend on the kind of work it will perform. These are the most common types:

Start/End Nodes
The graph system automatically creates two special node types:
- START Node: Marks the entry point of the graph
- END Node: Designates the completion point(s)

These nodes are system-generated and they cannot be manually created or modified, they can only be directed from/to as part of the flow execution.
LLM Nodes
Leverage an LLM model to perform its state processing operations.
Implementations can vary in the following ways
- Amount of LLMs
- Amount of prompts
- LLM models (e.g., GPT-4, claude-3-5-sonnet)
- Context allotted via inputs
- Enhancing with tools to upgrade to an Agent node


LLM node with a single LLM, and a single prompt that is made out of a conversation’s messages.
from langchain_anthropic import ChatAnthropic
def question_llm_node(state: State):
"""
This node answers a question
"""
model = ChatAnthropic(model="claude-3-5-sonnet-20240620")
prompt = state["messages"]
response = model.invoke(prompt)
if not isinstance(response, AIMessage):
raise ValueError("Unexpected response from the model. Expected an AIMessage.")
return {"messages": [response]}
Agent Nodes
You can enhance an LLM node by equipping it with tools.
Key features of tool-enabled LLM nodes:
- Dynamic tool calling based on LLM system prompts
- Progressive context building after each tool execution
- Flexible tool execution order
Agent node with a single LLM, and a two piece prompt: A list of a conversation’s messages and a personality prompt, which primes the LLM to process the prompt in a predetermined way.
from langchain_core.messages import AIMessage, SystemMessage
from langchain_anthropic import ChatAnthropic
def question_agent_node(state: State):
"""
This node answers a question using tool integration
"""
model = ChatAnthropic(model="claude-3-5-sonnet-20240620")
agent_personality = SystemMessage("You are a private investigator")
prompt = [agent_personality] + state["messages"]
response = model
.bind_tools([toolA,toolB])
.invoke(prompt)
if not isinstance(response, AIMessage):
raise ValueError("Unexpected response from the model. Expected an AIMessage.")
return {"messages": [response]}
Human in the loop (HIL) Nodes
Sometimes workflows need human input to provide guidance, approval or context. An HIL node acts as a human stand-in within the graph and you can have more than one if necessary.
The interrupt function saves the current graph state into memory, stops execution while waiting for user input, then once it receives input, it re-runs the human node function with the input value.
*Your graph will need to use MemorySaver() to save this state.
from langchain_core.messages import HumanMessage
from langgraph.types import interrupt
def human_node(state: State):
"""A node for collecting user input."""
user_input: str = interrupt(value={"Ready for user input."})
return {
"messages": [HumanMessage(content=user_input)]
}
Tool Nodes
A convenient node that can be used to group tools together that can then be used by an agent node.
from langchain_core.messages import AIMessage
from langchain_core.tools import tool
from langgraph.prebuilt import ToolNode
@tool
def get_weather(location: str):
"""Call to get the current weather."""
if location.lower() in ["sf", "san francisco"]:
return "It's 60 degrees and foggy."
else:
return "It's 90 degrees and sunny."
@tool
def get_coolest_cities():
"""Get a list of coolest cities"""
return "nyc, sf"
tools = [get_weather, get_coolest_cities]
tool_node = ToolNode(tools)
Agent nodes automatically return a tool calls list that will contain the names and execution order of the tools it deems necessary to call from the list of tools they have access to.
We can also create this call list programmatically and invoke the Tools Node with it.
*Providing two lists here will produce a parallel execution of the tools on those lists
message_with_multiple_tool_calls = AIMessage(
content="",
tool_calls=[
{
"name": "get_coolest_cities",
"args": {},
"id": "tool_call_id_1",
"type": "tool_call",
},
{
"name": "get_weather",
"args": {"location": "sf"},
"id": "tool_call_id_2",
"type": "tool_call",
}
]
)
#Call to the tools node
tool_node.invoke({"messages": [message_with_multiple_tool_calls]})
ReAct Agent Node
A Reason and Act Agent is a design pattern that involves an Agent Node and a Tool node. The Agent consumes the initial prompt and reasons which tool(s) should be called. Then it triggers the first of the tool calls, depending on the tool output the agent can decide whether to
- Carry on with the tool execution list in the order it had created
- Retry execution of the same tool because an error occurred
- Re-order the tool execution list
- Add or remove from the tool execution list
- Terminate its execution early proceeding to the next node in the graph execution
This back and forth continues until the Agent reasons it is done and terminates its execution with its rendered final output.
You could implement your own reAct agent following those principles or you can use the convenience function provided by the library.
from langgraph.prebuilt import create_react_agent
def italian_agent_node(state: State):
"""
Responds to prompts in italian
"""
prompt = [SystemMessage(content="Respond in Italian")] + state["messages"]
agent = create_react_agent(
model=model,
tools=[tool_a, tool_b], # you can pass your Tool Node here instead
state_schema=State,
state_modifier=prompt
)
response = cast(AIMessage, await agent.ainvoke(state))
return {"messages": response["messages"]}
The create_react_agent convenience function creates its own internal implementation of Tool Node as seen in the official Langchain Youtube channel video on the topic.
Best Practices
When implementing nodes, consider these key points:
- Validate response types for type safety
- Implement proper error handling
- Maintain clean state mutations
- Follow a consistent naming convention that reflects the type of node implementation
- Minimize the amount of tools each agent has access to.
State
This serves as the central communication mechanism between nodes in the LangGraph. It maintains crucial information, including:
- AI messages
- Tool execution results
- Human-in-the-loop (HIL) inputs
- Other contextual data
A basic implementation of state looks like this:
from typing import TypedDict, Annotated
class State(TypedDict):
"""The state of the graph."""
messages: Annotated[list, add_messages]
Why Messages in State?
Messages are the most common type of information stored in state because:
- LLMs primarily operate through conversation logs
- Context maintenance requires historical interaction data
- Enables seamless tool integration and API interactions
Working with Reducers
Reducers are fundamental to state management in LangGraph, determining how updates are applied to the state. Here are two key implementation patterns:
Default reducer behavior
In this case, updates simply override existing values.
from typing_extensions import TypedDict
class State(TypedDict):
foo: int
bar: list[str]
Custom reducer behavior
Here the bar field uses a custom reducer to combine lists instead of overriding.
from typing import TypedDict, Annotated
class State(TypedDict):
“”"The state of the graph.“”"
messages: Annotated[list, add_messages]
Here the bar field uses a custom reducer to combine lists instead of overriding.
Message Types and Communication
LangGraph provides several message types for different communication scenarios:
Core Message Types
- Human Message
- Represents user input
- Role: “User”
from langchain_core.messages import HumanMessage
message = HumanMessage(content="Hello, how are you?")
- AI Message
- Represents model responses
- Can include text or tool invocation requests
- Supports various media types
- Role: “Assistant”
- System Message
- Defines model behavior (Personality prompt)
- Contains configuration instructions
- Role “System”
- Tool Message
- Contains tool execution results
- Includes tool_call_id and artifact fields
- Role: “Tool”
Special Message Types
- AIMessageChunk
- Enables response streaming
- Used for real-time output display
- Remove Message
- No corresponding role
- Special type for chat history management
Practical implementation
When implementing a Lanngraph application, combine these concepts:
from langchain_core.messages import HumanMessage, AIMessage, SystemMessage
# Example model interaction
model.invoke([
SystemMessage(content="You are a helpful assistant"), HumanMessage(content="Hello, how are you?")
])
Tools
A tool in LangChain is essentially a function designed to perform a single, focused task. While commonly used for API calls in production environments, tools can be implemented to handle any programmable functionality.
We use the @tool decorator to create a tool component.
def multiply(a: int, b: int) -> int:
"""Multiply two numbers."""
return a * b
- Type hints for parameters and return values
- Clear docstring documentation
- Simple function implementation
Tool Usage with ToolMessage
from langchain_core.tools import tool
from langchain_core.messages import ToolMessage
@tool
def multiply(a: int, b: int) -> ToolMessage:
"""Multiply two numbers."""
result = a * b
return ToolMessage(content=str(result))
Key improvements in this version:
- Returns a ToolMessage instead of raw value
- Ensures proper result capture in the execution graph
- Maintains compatibility with LangChain’s message passing system
Graph Edges and Control Flow
In LangGraph, edges are the crucial components that define how information flows between nodes in your application. Understanding different types of edges and their implementation is key to building effective LLM-powered applications.
Required Edges: The Solid Connection
Required edges, represented by solid lines in LangGraph Studio, create guaranteed paths between nodes. These edges ensure that execution flows from one node to the next, regardless of the node’s output.
from langgraph.graph import StateGraph
builder = StateGraph(State)
builder.add_node("LLM 1", llm_1_node) #this adds a required edge
builder.add_node("LLM 2", llm_2_node)
builder.set_entry_point("LLM 1")
builder.add_edge("LLM 1", "LLM 2")
Required edges will always be traversed unless:
- An error occurs
- The execution is terminated by the user
- A node terminates execution before reaching this path
Conditional Edges: Dynamic Routing
Conditional edges, shown as dotted lines in LangGraph Studio, enable dynamic routing based on specified conditions. These edges can incorporate LLM-based decision-making for intelligent path selection.
def toys_agent_decision(state: State) -> Literal["Toys Agent", "Candy Agent"]:
messages = state.get('messages')
last_aimessage = get_last_aimessage(messages)
# LLM-based decision making
return decision_content
#this adds a conditional edge
builder.add_conditional_edges("Shopping Agent", toys_agent_decision)
Command Functions: Combined State and Routing
Command functions provide a powerful way to combine state updates with routing decisions in a single return value. This approach simplifies control flow management:
from langgraph.types import Command
#Literal values as a return type let langgraph studio know where to draw the conditional edges this node can traverse to
def my_node(state: State) -> Command[Literal["my_other_node"]]:
return Command(
update={"messages": "My message"},
goto="My other node"
)
Best Practices
- Use required edges for fixed workflows
- Implement conditional edges for dynamic routing
- Leverage command functions for combined state and routing control
- Consider using LLM-based decision functions for intelligent path selection
Multi-Agent Systems: Supervisor Architecture
When building a complex graph, it can be useful to create agents whose purpose is to delegate to other agents. This can be done using the tools that are part of the standard langGraph library.
A more convenient implementation for this use case is to use the create_supervisor convenience function. This is a late addition to the set of libraries provided by Langchain and will need an additional installation.
pip install langgraph-supervisor
We can then use the convenience function to create our graph as follows:
from langgraph_supervisor import create_supervisor
from langgraph.checkpoint.memory import InMemorySaver
from langgraph.store.memory import InMemoryStore
workflow = create_supervisor(
[research_agent, math_agent], #ReAct agent nodes
model=model,
prompt=(
"You are a team supervisor managing a research expert and a math expert. "
"For current events, use research_agent. "
"For math problems, use math_agent."
)
)
checkpointer = InMemorySaver()
store = InMemoryStore()
# Compile with checkpointer/store for memory
graph = workflow.compile(
checkpointer=checkpointer,
store=store
)
More information about how this works under the hood can be found on the Youtube implementation walkthrough by Langchain or the Github repo for this library .
Best Practices
LangGraph provides powerful tools that support a wide range of applications. The choice of tools for your workflows depends largely on the level of control you need over implementation details.
- If full control is not a necessity, consider using the convenience functions and classes—such as create_react_agent, create_supervisor, and Command—to streamline development.
- If you require greater control, leveraging the core building blocks (e.g., conditional/required edges and ToolNodes) allows for more precise customization.
- Often, a hybrid approach—combining both convenience functions and low-level components—can help you fine-tune control to best suit your needs.