Releasing Code Effectively with Source Control Organization
At Phase 2, we not only value writing great software but also managing and delivering that software as efficiently as possible. As a software developer, if I could I would just write code all day and not think about much else. However, when writing production-ready code, the actual writing of the code is just one piece of the bigger pie. An efficient, stable, and dependable release pipeline allows us to focus more time on developing new features. It reduces the time needed to troubleshoot and fix failed or buggy releases.
Here, we’ll cover two of the three pieces we use to achieve this: project tracking and source control management. The third piece is an automated release pipeline, which I’ll talk about in an upcoming post. Now, you may think that this is all obvious and a lot of basics. But any level of engineer should be able to find some takeaways to improve your processes.
Issue & Project Tracking – Jira
We use Jira to track all of our issues (bugs, user stories, and tasks). By organizing the issues into planned releases, we can work more efficiently. Our goal Is always to deliver code frequently and easily.
Before a new release is delivered, we use internal release names following an alphabetical order; Alfa, Bravo, Charlie, etc. This allows for easily referencing a release during discussion. This also helps decouple releases from real-world timelines. Using names based on dates (ex: ‘mm.yyyy’) can cause unnecessary difficulty when the update ends up slipping a month or two past it’s planned release.
It’s important to note that these are not hard and fast delineations that must be worked in order; finishing one before starting another. While that may be ideal, in reality we may have issues from two or three releases being worked on at once.
I’ve setup an example project that looks something like this:
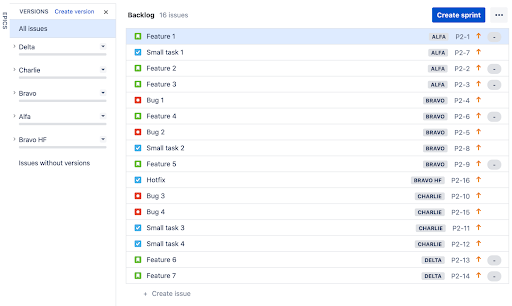
This sample depicts a small project with a smattering of issues, split into the Alfa, Bravo, Charlie, and Delta releases. With this view, we can look at how to organize our branches in source control in a clean and effective way.
Source Control | Git
As far as source control is concerned, where the repository exists doesn’t really matter. But what I’m going to be talking about here is specific to using Git. At any given time, we have three types of branches in our repository. These Include the main branch, release branches, and feature branches. The main branch is just the default branch and should always reflect what has been released to production. This may seem obvious, but I’ve seen this at other organizations: a bug has been found in production that no one can figure out how to reproduce. Then, developers discover what was in production wasn’t what everyone thought it was.
Let’s talk about the other two types, release and feature branches.
Release Branches
In addition to the main branch, every planned release that is actively being worked has a corresponding branch in Git. Any code that has been peer reviewed and approved, but not yet released to production, lives on a release branch. Based on the example Jira project from above, our repository will look like this:
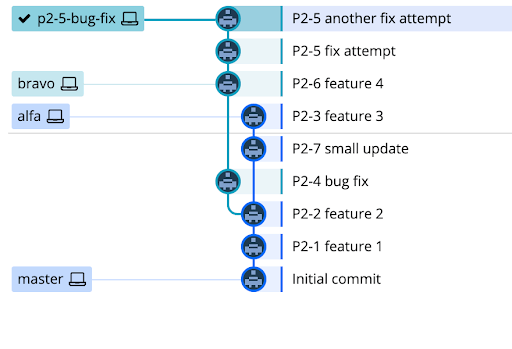
In this case, nothing from charlie or beyond has been started, so we just have a release branch for alfa and bravo. While an ideal state would be for bravo to be branched off of the last commit of alfa, in practice that is rarely the case as new work is merged into the release branches. Occasionally we will rebase future release branches onto their predecessors to keep the Git history clean between releases. This is a fairly seamless process compared to cherry-picking commits or trying to merge branches back and forth into each other.
Feature Branches
Every issue that is worked will have its own feature branch, named with its corresponding Jira issue number. All code that is still in progress and has not yet been reviewed and/or approved lives on a feature branch.
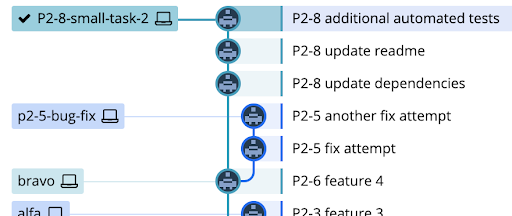
This is where the actual daily work gets committed. When the work is done on an issue, a pull request (PR) is opened in GitHub for the feature branch so that it can be peer reviewed (You are doing peer review, right?). Once that has been approved, we specifically want to perform a “squash and merge” operation. This squashes all the commits on that feature branch into a single commit that is merged to the release branch. This keeps the history on the release branches and main much cleaner.
Putting It Together
Release Time
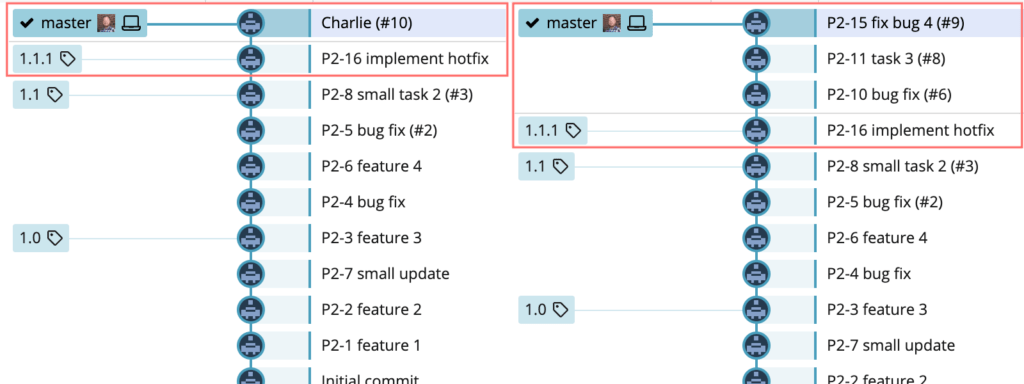
When the time comes for a version to be released, then that release branch will be merged into main. This process is almost identical to merging a feature branch into a release branch. A PR is created in GitHub so that the changes can be reviewed and approved, and then merged into main. Here, you may want to do a “rebase and merge” instead of squash. Then, the history of each issue on the release branch can be preserved. This difference is illustrated below, where the release branch charlie was merged with a squash and merge on the left and a rebase and merge on the right.
We also create a tag in Git, using the chosen semver, on the HEAD of main for each release. This serves a couple purposes. First, it makes it easy to see at a glance when each release happened and what changes were included just by looking at the Git history. We can also use these release tags to drive our automated release process. More on that in the next part of this blog post.
Differences Between Jira and Git
This is all nice and pretty, but in the real world things are going to change. There may come a time when there is code for a feature on a release branch in Git, but that feature has been moved to a future release in Jira. This is okay! You can always do the dance in Git of cherry-picking commits to other branches and reverting those changes in the current release. But if you’ve got a dependable method for feature-flagging code, it may be best to just leave it as is. Once the feature’s planned release is ready to go, the feature flag can be removed.
Hotfixes
Another inevitable part of working on any real world project is that you’re going to have to make a hotfix. Depending on the issue, you will need to get some code out quickly ahead of what you’re currently working on. It could be a bug found in production or simply a business requirement that can’t wait for the next release. This is where a lot of methods for managing all of this tend to fall apart, but for us this is a pretty painless process.
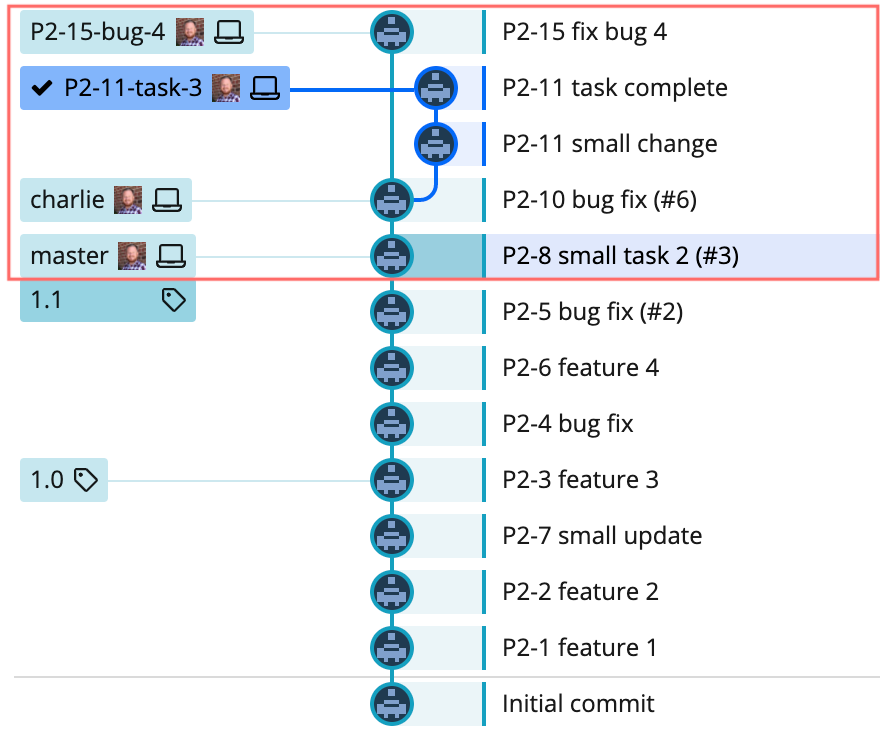
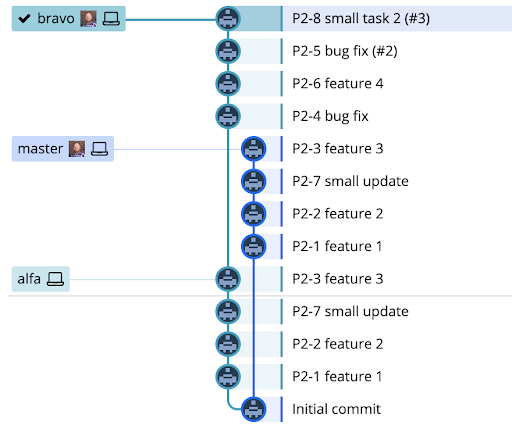
Let’s say we’ve moved ahead and the Bravo (v1.1) release is in production. Now we’ve started working on the Charlie release. Here’s how the repo looks:
Even though Charlie is in the middle of development, the decision makers have decided that a hotfix needs to be pushed to production asap. No problem! A quick pull request is prepared, reviewed, and approved, (squashed-merged in this specific case) and our hotfix is ready to go to production.
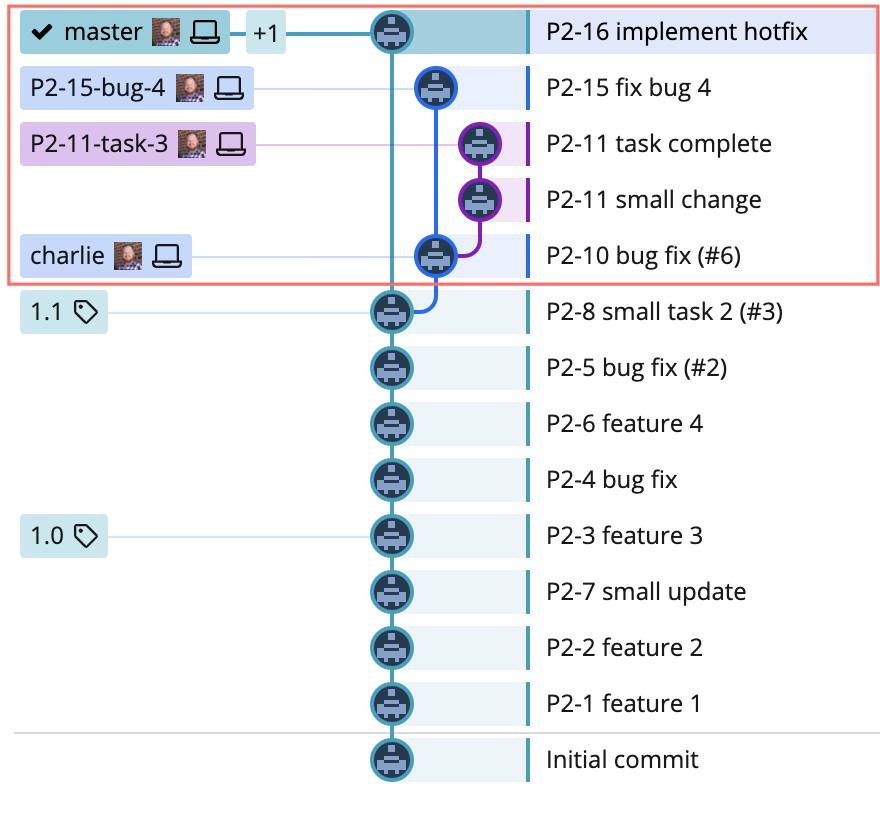
Now it’s simply a process of rebasing the Charlie release branch onto main, and then the various feature branches onto Charlie, as if this was just another planned release.
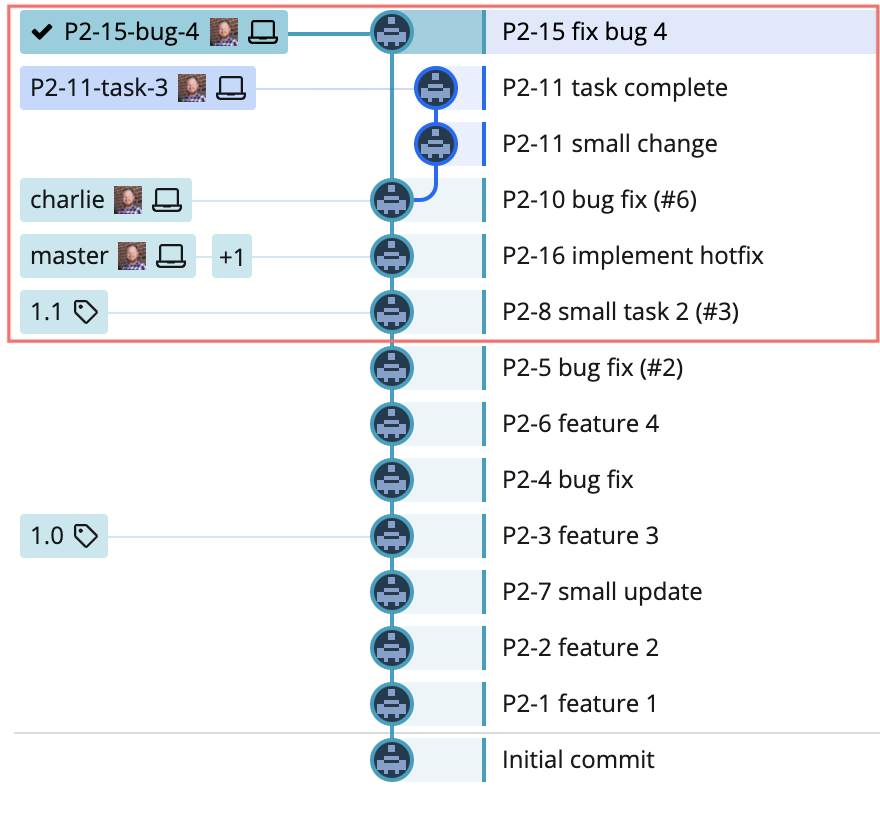
The hotfix is out, and the devs can get right back to what they were working on with barely a second thought.
Rebasing | Git rebase –onto
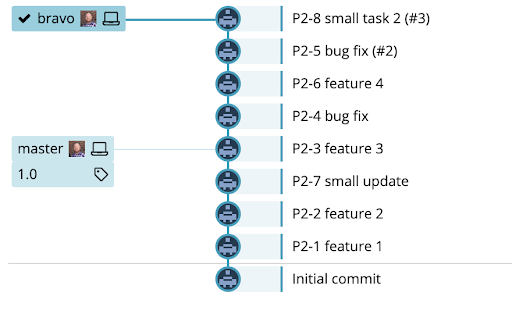
A note on rebasing. I’ve mentioned rebasing feature/release branches as a frequent exercise in managing these branches. This is made easier by using the --onto option of the git rebase command, specifically with 2 arguments (the --onto option accepts 1 to 3 arguments). Take for example this situation:
The alfa release branch has been merged to main, and alfa has been released to production. The bravo branch should now be based on main, instead of on the remaining local version of the alfa branch. A simple rebase in this case will replay all of the commits from alfa onto main, where they already exist, causing a potential big headache of merge conflicts. With the --onto options, we can tell Git that we want to “rebase just the four commits in bravo, starting with P2-4 bug fix commit”. The first argument will be the new base we want (main), and the second argument will be the current base we want to rebase from (the HEAD of alfa). With the bravo branch checked out, this command would look something like this
git rebase --onto main alfa
You can also use hashes as references to specific commits. If we had deleted the local alfa branch in the example above, we would still need to be able to reference the old base. If the sha of P2-3 feature 3 was 461526, then the command would look like this:
git rebase --onto main 461526
The result will look something like this:
And that’s it. In my experience this has helped turn merge-conflict-nightmares into something much more manageable.
Checklists
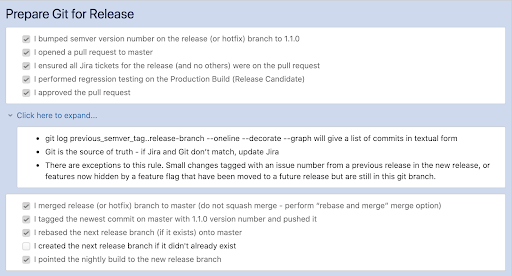
Before I wrap up, I want to share one more key element of the delivering code process; checklists. The goal here is to make releasing code quick, easy, and as fool proof as possible. More often than not, the biggest point of failure in all of this are the humans. Have you ever released code out to production, only to realize a few days later that you forgot a small but important step in the process? Accidentally including unfinished code, forgetting to update version numbers, or even releasing code in a wrong build configuration. I’ve seen it happen, and it’s never pretty. We follow a checklist to ensure that sort of thing never happens. We use one that looks a lot like this:
Conclusion
This should give you a good starting point for managing your code releases. At least it provides you good ideas on how to tweak what you’ve got to make things easier and more consistent. By simplifying this whole process, we can more easily put together and manage an automated release pipeline. In turn, this makes releasing code more consistent and less error prone. In the follow-up blog, I’ll look at how we’ve taken what I’ve discussed here and built on it to achieve automated releases.