
Master iOS App Navigation with Tab & Navigation Bars | iOS Development Guide
When you start developing applications for iOS devices, considering how to navigate your various views is an important step in architecting a solution that is both simple, powerful, and easy to understand for your users. Your requirements likely involve a complex workflow of activities based on your user interactions, and a cohesive navigation system is important to get right.
Apple provides multiple pre-built controllers for navigation that their engineers also use in iOS’s stock apps. The Apple Mail app uses a navigation controller, which resides at the top of the application to provide a breadcrumb to get back to previous views, buttons for taking action, and the name of the current view. Apple Photos uses this also but also uses a tab bar controller at the bottom to give you options for displaying photos, albums, or even searching for the perfect picture.
However you want users to navigate your app, you will likely end up using one or both of these navigation schemes. There are plenty of tutorials online for setting up navigation bar controllers and tab bar controllers, but what if your application needs both? The interaction can get a bit tricky managing the state between the two, so the goal for this blog post is to clear up any confusion and show a reasonable pattern for allowing the two to talk to each other, and make navigation seamless for your users. This article assumes a basic understanding of the Xcode interface and familiarity with creating simple iOS applications. If you want to learn iOS from scratch, I recommend checking out Angela Yu’s Bootcamp on Udemy as a fairly comprehensive and in-depth educational resource.
Setting Up the Application
Instead of walking through the basics of setting up a new iOS project in Xcode, adding the individual view controllers and all the associated view elements, and linking them together, I provided a basic project you can clone or download to open in Xcode and play with yourself.
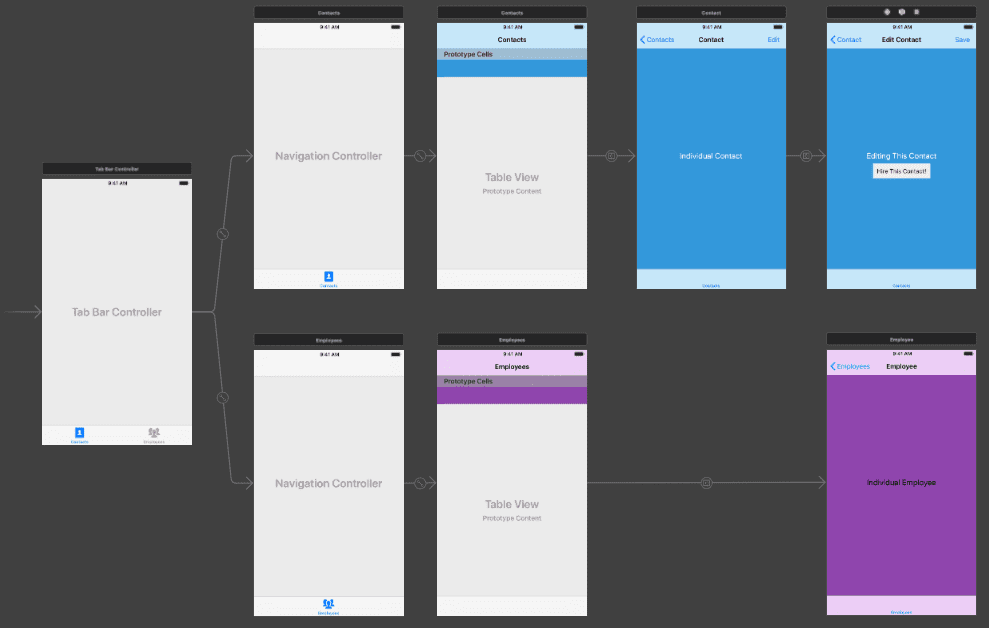
The project has both a tab bar controller and navigation controllers in place, with basic segues mimicking the management of both contacts and employees for a fictitious company called Navigatron.
Tab Bar Controller Setup
When creating a new application using a tab bar controller, you can either start with the project template that includes a tab bar controller, or a single view app. I recommend starting with the single view app as a barebones entry for your application to really start understanding how all the components work together.
With a single view selected, you can easily go to the Xcode menu and choose Editor -> Embed In -> Tab Bar Controller . That will create a new tab bar controller for you, move the application’s entry point to that controller, and set that original view controller as the first controller displayed in that first tab.
From there you can add another view controller to the storyboard, CTRL-Click the tab bar controller, and drag onto the new controller which will add it as a new tab. If you run the application, you will see multiple tabs, and clicking the tab icons will toggle between the two views.
Tab bar controllers work is by holding an array of view controllers. The user can toggle which one is selected by tapping the icon at the bottom of the view. New view controllers for a given tab are instantiated the first time they are shown, but the tab bar controller doesn’t re-instantiate the view controllers each time you tap the tab. So if you navigate to “point A” on the first tab, tap the second tab, make some changes there, then tap on the first tab you will still be at “point A”.
Navigation Controllers Setup
Adding navigation controllers to your views is just as easy: Select the view in question, click on Editor -> Embed In -> Navigation Controller and you are off to the races. As you add more view controllers and create segues from one to another, the target view controller will get wrapped in the navigation along with the original. That’s how you get that breadcrumb navigation along with a space for bar button items and title of the current view.
A frequent question that comes up for new iOS developers is how to properly add a navigation controller to an application that has a tab bar controller. Here’s the secret:
Each view controller representing a tab will need its own navigation controller.
You don’t share a navigation controller between the views for each tab in your tab bar set up, instead they each get their own navigation. This will be especially important to understand once we start navigating between them.
The sample Navigatron project has this laid out for you. On the storyboard, you can visualize it like this:
Now Things get Complicated
What happens when you are editing a contact, and want to have an action that jumps you over to view an employee? In other words, let’s say that on your “Contact Edit” view you can have an action that results in hiring the contact as an employee, and you want to display the employee view once everything is finished.
Ideally in this scenario, you are done with the contact so you want the navigation to reset, and you want to automatically go to the “employees” tab and show the individual employee view. How do you go about this?
First Attempt: A Basic Segue
At first glance, you might think the “Hire This Contact!” button can perform its needed modifications and just segue over to the employee view controller. It makes sense, but what happens when you do this?
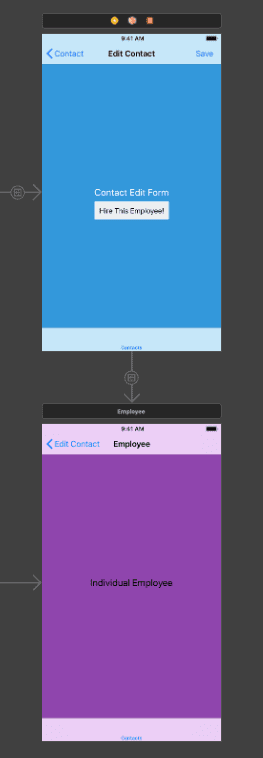
The application runs, performs any specified save actions, and navigates to the individual employee view controller as we want it to. So everything is good, right? Well, look at the state of the form:
There are two major problems with this approach: First off, the selected tab is still the “Contacts” tab and not the expected “Employees” tab. And the history of the navigation controller has the full history of navigating from the contacts list, the individual contact, editing the contact, and the currently displayed employee view controller. In other words, this navigation is a mess!
The Navigation Stack
View controllers utilize a stack data structure. When one is displayed, it is placed on a stack (or a pile) of views. You see whatever is at the top of the stack. When you are done with it, you can “dismiss” or “pop” it off the stack and you see the previous view sitting underneath.
So with our flawed approach of using a segue to go directly to the employee view on the “Employees” tab, we end up just adding more to the stack instead of properly navigating it.
Apple provides multiple ways to get back from a view. A modal view can use the dismiss method to go back a view, normal views can use popViewController to do the same thing, or you can define an “unwind” segue to go back to an arbitrary point in the stack of view controllers.
If a normal segue from one controller to the next is an “action” segue, an “unwind” segue is the opposite. As the name implies, it will reverse through the stack from the currently displayed view, to wherever you wish to go.
How Do We Solve Our Messy Problem?
We need a two-pronged approach to solve this issue. First off, we will need to handle the navigation controller state, then secondly select the appropriate tab, and finally show the proper employee view controller.
Handling the Navigation Controller Issue
First off, get rid of the naive segue to the employee view controller. Then we can either create a normal segue back to the Contacts list, or (better yet) unwind back to the employee list so our navigation history is properly managed.
To start with, we will open up the file ContactsTableViewController.swift , as the controller contained in the file is the intended target of the navigation of the “Contacts” tab once the “Hire This Contact!” button is tapped. Then we will add this code:
@IBAction func hireContact(segue: UIStoryboardSegue) {

}
Right now, it won’t do anything but serve as a target for the unwind segue. It’s also interesting to note that unlike normal action segues when creating an unwind segue you do not CTRL-click the element from Interface Builder onto the code to create the skeleton of the method. Instead, you have to manually define the method first in your destination controller, and then go to the source and CTRL-click the element and drag to the Exit icon of its controller. It seems backward, but unwind segues are backward on purpose.
Now that we have the method for the unwind segue in place, we will go back to the storyboard and CTRL-click the “Hire This Contact!” button on the contact edit view controller and drag up to the Exit icon in the toolbar at the top of the same controller (not the ContactsTableViewController). This will pop up a menu.
Choose hireContactWithSegue from the menu to create the segue. In the Identity Inspector for the segue that is created, give it the identifier GoToHireContact so we can reference it programmatically.
Now, if you run the application, you will see that hitting the “Hire This Contact!” button takes you back to the contacts list with the proper history, but that’s not quite what we want. We need to handle the tab navigation as well as allowing us to pass data to the employees controllers to load the proper view.
Handling the Tab Bar Controller Issue
Now that our navigation controller is taken care of, how do we properly transition to the correct tab?
The answer comes from adding code to the hireContact(segue: UIStoryboardSegue) method we created in the contacts table view controller, which serves as the unwind segue when clicking on the “Hire This Contact!” button. This allows us to make the changes we need and pass any data to the employees controller as the unwind segue happens.
What we’ll do is to first, get a reference to our tab bar controller, set the selected index to the tab we want to transition to, look for the appropriate controller on the tab’s stack of controllers, and set a bit of data. The code looks something like this:
@IBAction func hireContact(segue: UIStoryboardSegue)
 { var employee: String = ""

 // Pull the contact information from the source controller
 if let contactEditViewController = segue.source as? ContactEditViewController {
       employee = contactEditViewController.selectedContact ?? ""
 }

 // The index of the tab that holds our EmployeesViewController
 // NOTE: Tabs are zero-indexed, so 0 = Contacts, 1 = Employees
 self.tabBarController?.selectedIndex = 1

 // Get a reference to the EmployeesNavigationController. It is the
 // 'selectedViewController' since the tab bar controller doesn't
 // know about each navigation controller's child view controllers.
 // It only knows about ContactsNavigationController and
 // EmployeesNavigationController
 if let employeesNavigationController = self.tabBarController?.selectedViewController as? UINavigationController {
       // Check whether the top-most view controller on the stack is an 'EmployeeViewController'
       // This will change in complexity if you have more complicated logic.
       if employeesNavigationController.topViewController is EmployeeViewController {
       employeesNavigationController.popViewController(animated: true)
       }

       // Get a safe reference to employeesTableViewController. This is technically
       // unnecessary since we know it will be available, because it was instantiated
       // and added to the stack when we set the tab bar controller's selected index
       // to 1, but it's good practice nonetheless.
       if let employeesTableViewController = employeesNavigationController.topViewController as? EmployeesTableViewController {
              employeesTableViewController.selectedEmployee = employee
        }
    }
}
To get this to compile, we will need to make a change to our EmployeesTableViewController to allow it to accept the additional data of an existing employee object. It’s as easy as adding this line to the class definition:
var selectedEmployee: String?This creates a String optional, and we can then check for its existence in a viewWillAppear method. To make our intentions crystal clear, however, we can instead take advantage of Swift’s observed properties:
var selectedEmployee: String? {
    didSet {
        performSegue(withIdentifier: "GoToEmployee", sender: self)
    }
}
The prepare(for segue: ...) method call in the EmployeesTableViewController already does everything we need. Since we moved the call to performSegue(withIdentifier: ...) to the observed property, we no longer need it in the method tableView(_ tableView: UITableView, didSelectRowAt indexPath: IndexPath) , so remove that line. Just setting the value for selectedEmployee will be enough to trigger the segue. The method should look like this:
override func tableView(_ tableView: UITableView, didSelectRowAt indexPath: IndexPath)
{
selectedEmployee = employees[indexPath.row]
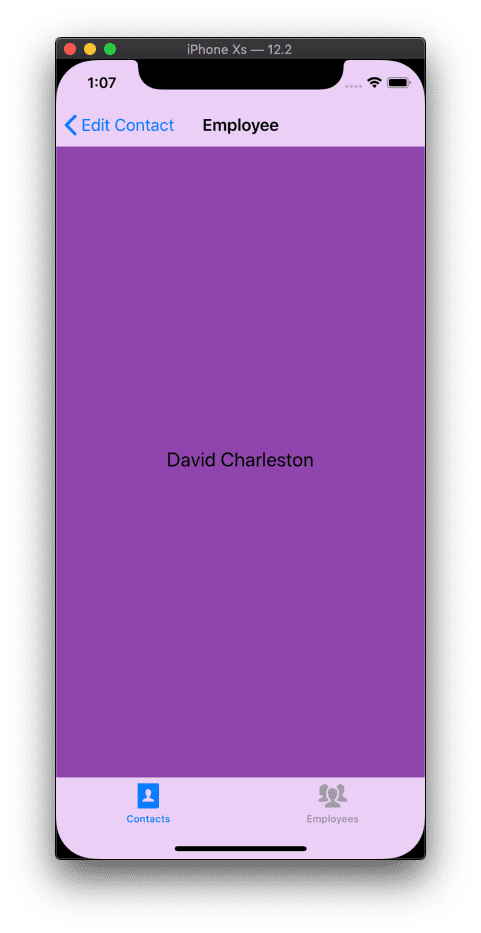
}Here is the end result:
The interaction between the two types of navigation controllers is slightly more complicated than dealing with just one, but if you think about handling state for the navigation controller and the tab bar controller individually, it makes sense and isn’t as difficult as you’d think. The final code for this is available in the completed repository if you want to download that to see it in action.